- Deutsch (de)
- English (en)
Everyone who has become infected with the topic of smart home considers almost continuously how he/she can still automate manual, recurring tasks further. Provided that the appropriate sensors and actuators are already available. A sensor area that seems somewhat underrepresented is the occupancy sensor, e.g. to trigger or refrain from actions by going to bed.
There are alarm mats as bed rugs or professional bed sensors from the care sector. The seat sensors from the automotive industry also perform a similar task. What they all have in common, however, is the lack of connection to an open protocol such as MQTT or Home Assistant and of course the usually very high purchase costs.
Some resourceful developers have addressed this gap and have, for example, integrated switches into the bed frame Selbstgebauter Bettsensor... Steuern und Regeln im Schlaf!
My approach looks a little different to be as minimally invasive as possible for the bedstead. I use a pressure-sensitive resistor (FSR) as a sensor. It is also available in an extra long version of 60cm FSR 408. When unloaded, the resistance is high ohm (> 10MOhm) and with a load of 10kg the value is reduced to a few 100 ohms. The sensor is self-adhesive and can be easily attached to a slatted frame, for example.
With the FSR 408, the existing pressure can easily be evaluated with a simple resistor network and an A/D converter or comparator. There are several options for getting the value into the smart home network. One of the simplest is an ESP8266 module (ESP-07) with the open-source firmware called ESP Easy. By the way, you can find a similar approach with a Raspberry Pi here.
The solution for the occupancy sensor should meet the following requirements:
The resistor network for evaluating the pressure looks like this:
The output voltage to the ADC is calculated as follows:
V_ADC = Vcc ( R2 / (R2 + R1) )
where Vcc = 3.3V. The corresponding voltage values for the support points of the force diagram are listed in the table:
| Force [kg] | FSR Resistance [KOhm] | V_ADC [V] | Digital Value [dec] |
|---|---|---|---|
| 0.1 | 6 | 0.05 | 51 |
| 0.5 | 2 | 0.16 | 164 |
| 1.0 | 1.2 | 0.25 | 256 |
| 2.0 | 0.75 | 0.39 | 399 |
| 4.0 | 0.45 | 0.60 | 614 |
| 7.0 | 0.30 | 0.83 | 849 |
| 10.0 | 0.25 | 0.94 | 962 |
In our application, the maximum value should not exceed 1V, as the internal analog reference voltage of the ESP-07 is 1V. We also need a multiplexer to evaluate two sensors. The complete circuit diagram is still very simple.
Of course, you can also connect just one FSR408 with R2 directly to the module, possibly avoiding the circuit board with free wiring.
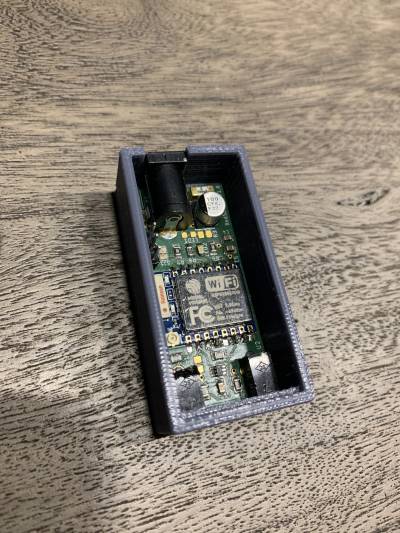
In order to keep the module as small as possible, the circuit is made in SMD. Suitable home soldering techniques have already been published in various places.
The sensors are connected via standard 2.5mm jack sockets (JY029). The power supply can also be plugged in with a 5.5 / 2.1mm hollow socket (HEBW21). You can find it very inexpensive Power Supplies with stabilized 3.3V DC voltage output. The bed sensor does not need more wired connectivity.
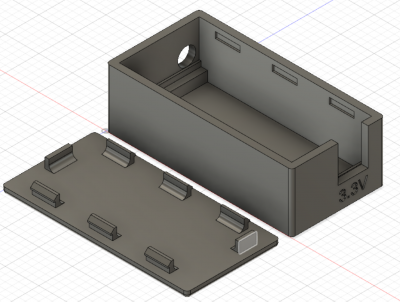
With a 3D printer an inconspicuous housing can be realized which can easily be attached with double-sided adhesive tape underneath the bed.


After the hardware has been created we still have to program the ESP module. As already mentioned, the bed sensor is based on ESPEasy. In the link you can also find instructions on how the ESPEasy firmware is installed on the module. In order to get into the programming mode, the jumper SJ1 must be closed during the reset release. The programming is done serially via JP1 (USB-serial converter).
If everything went well and the module is integrated in the home WiFi, all further settings can be made via the web interface. For this we need:
The bed sensor should connect to an existing MQTT server and transfer the current occupancy information to it if there is a change. To do this, we go to the Controller tab and enter the relevant data. This includes the IP address of the MQTT server and the account data for logging in. The result should look similar to the following example.
Second, we need a device that measures and stores the analog value. This can be done via the Devices tab. There is a separate device for each sensor and we also need a dummy device to temporarily store the previous measurement value.
Incidentally, the green numbers on the right indicate the current measured values. In the example nobody is in bed.
Here are the settings for the devices:
Now we have a connection to the MQTT server and we can query the measured values of the ADC. What is missing is the flow control. There are the Rules for this within the ESPEasy: To do this, copy the following code into Rules Set 1.
On System#Boot do
  gpio,12,0
  TaskValueSet 3,1,100 	// default value at boot
  TaskValueSet 3,2,100 	// default value at boot
  timerSet,1,1
endon

On Rules#Timer=1 do
  TaskRun,1 	// Measure Bed 1
  GPIO,12,1
  TaskRun,2 	// Measure Bed 2
  GPIO,12,0

  if [sensor_1#analog] < 50 and [BedStatus#Bed1_Prev] > 49
    TaskValueSet 3,1,[sensor_1#analog]
    publish /home-assistant/%sysname%/sensor_1/analog,OUT
  endif

  if [sensor_1#analog] > 49 and [BedStatus#Bed1_Prev] < 50
    TaskValueSet 3,1,[sensor_1#analog]
    publish /home-assistant/%sysname%/sensor_1/analog,IN
  endif

  if [sensor_2#analog] < 50 and [BedStatus#Bed2_Prev] > 49
    TaskValueSet 3,2,[sensor_2#analog]
    publish /home-assistant/%sysname%/sensor_2/analog,OUT
  endif

  if [sensor_2#analog] > 49 and [BedStatus#Bed2_Prev] < 50
    TaskValueSet 3,2,[sensor_2#analog]
    publish /home-assistant/%sysname%/sensor_2/analog,IN
  endif

  TimerSet,1,1
endon
During the system boot we set the multiplexer to input 1, the start values to 100 and a timer that calls the following routine every second. Both values are read out every second and if there has been a change to the threshold value, the result is sent to the MQTT server. These are the states IN and OUT. You can of course also transmit the current values and leave the decision as to whether IN or OUT to the home automation. In the following example I recorded a night like this.
The integration into Home Assistant lcan be easily done with ESPHome. All mandatory infos about the programming can also be found there online. Here the final code for Bedsensor:
esphome:
  name: bedsensor
  on_boot:
    then:
      - delay: 20s
      - output.turn_off: led_blue

esp8266:
  board: esp01_1m

# Enable logging
logger:

# Enable Home Assistant API
api:
  encryption:
    key: "--key--"

ota:
  password: "---password---"

wifi:
  ssid: !secret wifi_ssid
  password: !secret wifi_password

  # Enable fallback hotspot (captive portal) in case wifi connection fails
  ap:
    ssid: "Bedsensor Fallback Hotspot"
    password: "--password--"

captive_portal:

switch:
  - platform: gpio
    pin: GPIO12
    id: sensor_select
    internal: true

output:
  - platform: gpio
    pin: GPIO2
    inverted: true
    id: led_blue

sensor:
  - platform: adc
    pin: A0
    id: bed_raw_adc
    update_interval: 1s
    raw: true
    accuracy_decimals: 0
    internal: true
    on_raw_value:
      then:
        - lambda: |-
            if (id(sensor_select).state) {
              if (x < 50) {
                id(bed_sensor_2).publish_state(false);
              } else {
                id(bed_sensor_2).publish_state(true);
              }
              id(sensor_select).turn_off();
            } else {
              if (x < 50) {
                id(bed_sensor_1).publish_state(false);
              } else {
                id(bed_sensor_1).publish_state(true);
              }
              id(sensor_select).turn_on();
            }

binary_sensor:
  - platform: template
    name: "Bed Sensor 1"
    id: bed_sensor_1

  - platform: template
    name: "Bed Sensor 2"
    id: bed_sensor_2
Here the recording of the converted values [0..1023] for one night. The drops are not caused by age-related incontinence but rather the short-term cuddling away in the middle of the bed 
The bed sensor has been running without problems for 2 years now. Depending on how stable the home WiFi is, it may be necessary to restart the bed sensor.
If you like my articles feel to donate a cappuccino or so…