Translations of this page?:
TechWiki
GW60 Rollo
- GW60 Superrollo
- Hardware
- Programming
- S/W extension
- TRADFRI Modul
- Modul H/W
- Programming
- Tools
- GW60 TRADFRI adapter
- Schematic
- Programming adapter
- Housing
- Integration
This is an old revision of the document!
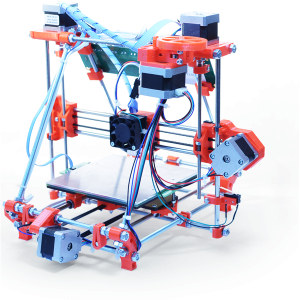
Frame: https://reprappro.com/documentation/huxley/
Controller (Melzi): http://reprap.org/wiki/Melzi
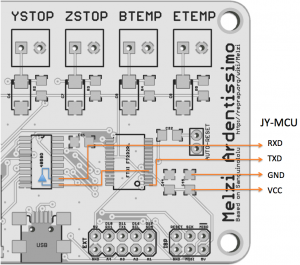
In order to get rid of the USB connection between Melzi and the PC one may like to use Bluetooth. There is a cheap module available in the market called 'JY-MCU' (vendor Shenzhen Jiayuan Electronic Co.,Ltd.).


Before the module can be used the default setting has to be changed. Connect the module from PC via USB↔RS232 (RxD/TxD) interface with default settings (9600, N, 8, 1). The module shouldn't be paired at that moment. Apply with a terminal program the following AT commands:
AT OK
AT+BAUD8 OK115200BAUD (set baud rate for Melzi)
AT+NAMEHUXLEY OKsetname (optional set name, default: linvor)
AT+PIN0000 OKsetPIN  (optional set pin, default: 1234)
More details about the configuration you will find here [1]
On Melzi one of the unused buffer of soldered IC 4050D takes over the mandatory level-shifting (5V → 3.3V). Overall only 5 wires have to be soldered. Note that the TXD outputs are connected in parallel which is not recommended. On Arduino boards the serial chip is connected to the main IC via 1kOhm resistors for this reason. This are not present in the Melzi board design.
Once you have setup your BT devices you can pair it, select from drop down list and control your RepRap as usual.
In order to get for print area (Z dimension) I positioned the PCB in top. The original printed PCB holder (4pcs.) ate reused. The PCB is mounted on a laser-cutter 1.5mm thick Kraftplex.


| Item | X | Y | Z | Unit |
|---|---|---|---|---|
| max values | 143 | 144 | 45 | mm |
| bed size | 140 | 140 | - | mm |
| print area | 100 | 100 | 45 | mm |
| offset bed | 3 | 4 | 0 | mm |
| offset print area | 23 | 24 | 0 | mm |
